Menu
| Transact | > | Tenant | > | Receipt |
Mandatory Prerequisites
Prior to entering a Debtor Lease Account Tenant Receipt Transaction, refer to the following Topics:
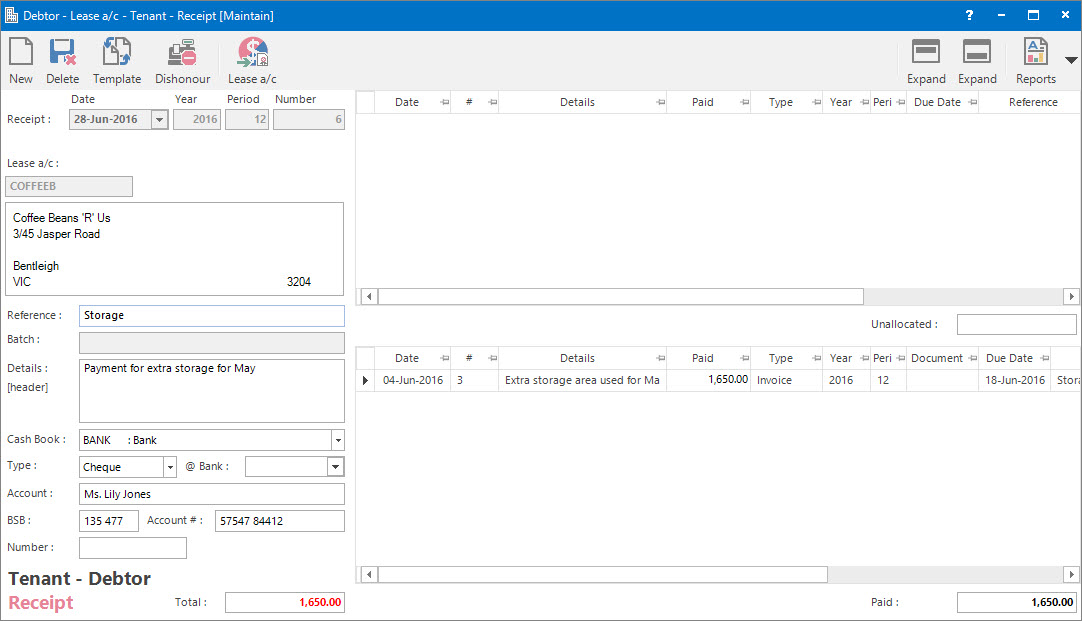
Screenshot and Field Descriptions
Receipts follow the Double Entry book-keeping rule of having a balanced set of entries.
A Red Credit Cash Book Total on the Left, balanced by net Black Debit Debtors Control Receipt Allocations on the Right.
Left Hand Side fields:
Transaction Date: this is the date of the transaction. Normally it must fall within the Accounting Period defined by the Year and Period.
The default values for Transaction Date, Year and Period come from the Accounting Period marked as Current.
Lease a/c: this is the Tenant (Debtor) Account ID.
Reference: this is a free format, optional reference entry field.
Batch: this is a read only field that displays the batch number / date of when the transaction was interfaced with another system.
Details (Header): this is a free format, optional detail associated with the whole transaction (header).
@ Bank: this is the banked date of the transaction and ties into the Bank Reconciliation.
Account: this is the a/c Bank Account Name.
BSB: this is the a/c Bank Account BSB Number.
Account #: this is the a/c Bank Account Number.
Default values for the Cash Book, Type, Account, BSB and Account # fields can be set on the a/c.
Number: this is the banking reference Number for the transaction eg. Cheque Number.
Right Hand Side fields:
Unallocated Items table: this is the upper table. It contains rows of Unallocated / Unpaid transactions.
Unallocated: this is the total of Unallocated / Unpaid transactions.
Allocated Items table: this is the lower table. It contains rows of Allocated / Paid transactions.
Paid: this is the total of Allocated / Paid transactions.
The allocation process involves shifting items from the upper table to the lower table.
The correction process involves shifting items from the lower table to the upper table.
Single Items are shifted between the tables by double clicking a source line item.
All Items are shifted between the tables by double clicking the source table top corner box.
It is permitted to change the values in the Paid column of the lower table if items are to be only partially allocated. This will result in the item being split, with an unallocated portion in the upper table and an allocated portion in the lower table.
Screenshot and Field Descriptions: Residual Over / Under Payment
![]()
Lease: this is the Lease ID.
Enter COA for Cash Book accounting / reporting:
Details: this is a free format, optional detail associated with the residual line. It will default to the value set up for the COA.
GST: this is the residual line's GST Type. It will default to the type set up for the COA.
GST From: this is a historical field and current use is now irrelevant.
How Do I : Search For and Maintain Entities
These General Rules are described in the Fundamentals Manual: How Do I : Search For and Maintain Entities
How Do I : Add a new Receipt Transaction
There are several ways of adding new transactions:
Left Hand Side Fields:
These relate to the whole of the transaction:
Right Hand Side Fields:
The Unallocated Items table (upper) will contain all the outstanding or partially outstanding transactions for the a/c.
The Allocated Items table (lower) will initially be empty.
Final:
How Do I : Modify an existing Receipt Transaction
How Do I : Dishonour a Receipt Transaction
How Do I : Delete an existing Receipt Transaction
A transaction can only be deleted if there are no other transactions associated with it, its Accounting Period is Open and it has not been Deposited or Reconciled.
Debtor Lease Account Tenant Receipt Transactions are associated with the following Topics: